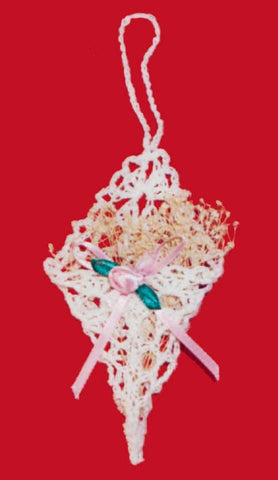
Lace Cone Christmas Ornament - Free Crochet Pattern
Click the banners below for more popular holiday patterns, available via mail or download!

LACE CONE
CHRISTMAS ORNAMENT
Easy Skill
Size:About 2½" wide and 4½ tall
Materials:
Size 10 Crochet Cotton: White (W) - 20 yards.
⅛" wide Pink Satin Ribbon - 8" long
White Dried Flowers; Small Pink Rose
Hot Glue (for starching); Thread Needle
Crochet Hook:Steel 7 (1.65 mm)
Abbreviations
Starching Directions
Soak Cone in water and squeeze out. Then soak piece in Glue and squeeze out. Stuff Plastic Wrap inside of Cone for shaping. Pin into stated size. Allow to dry completely.
CONE
Rnd 1:(Right Side) Starting at center; ch 1 (center ch), ch 3, (counts as first dc now and throughout), (ch 3, dc in center ch) 7 times, ending with ch 1, hdc in first dc (forms last lp and positions thread for next rnd). (8 dc)
DO NOT TURN EACH ROUND.
Rnd 2:Ch 6, sc in next ch-3 lp, (ch 5, sc in next ch-3 lp) around, end; ch 2, dc in first ch of beg ch-6. (8 ch-5 lps)
Rnd 3:Ch 3, (dc, ch 3, 2dc) in same lp as joining, ch 5, sc in next ch-3 lp, ch 5, * (2 dc, ch 3, 2 dc) in next ch-3 lp, ch 5, sc in next ch-3 lp, ch 5; rep from * around; join with sl st to first dc.
Rnd 4:Sl st to next ch-3 sp, ch 3, (2 dc, ch 3, 3 dc) in same sp, (ch 3, sc in next ch-5 lp) twice, ch 3, * (3 dc, ch 3, 3 dc) in next ch-3 sp, (ch 3, sc in next ch-5 lp) twice, ch 3, rep from * around; join.
Rnd 5:Sl st to next ch-3 sp, ch 3, (3 dc, ch 3, 4 dc) in same sp, (ch 3, sc in next ch-3 lp) 3 times, ch 3, * (4 dc, ch 3, 4 dc) in next ch-3 sp, (ch 3, sc in next ch-3 lp) 3 times, ch 3; rep from * around, join. Finish off leaving long end.
Assembly
- Holding right sides together, fold square into a triangle. Using long end, sew one side of triangle. Turn piece to right side.
- Fold cone so stitched side is facing center front.
Edging
Rnd 1:With right side facing, join with sl st to top corner ch-3 sp, ch 1, sc in same sp, ch 40, sc in same sp as joining (hanger made), * ch 3, skip next st or ch, sc in next st or ch; rep from * around, ending with ch 3, sl st in first sc.
Finishing
Follow general starching directions.
- Fill and glue Dried Flowers inside Cone.
- Tie a 2" bow with ribbon. Glue Bow to center front of Cone. Glue Rose to center of Bow.


