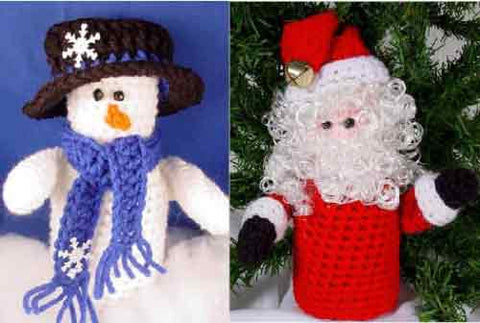
Santa & Snowman Mini Bottle Topper Free Pattern
Click the banners below for more popular patterns, available via download!

Santa & Snowman Mini Bottle Topper
FP160
Santa
Finished Size: About 8" tall
Materials: Worsted Weight Yarn; 1 ozs (70 yds) Red (R), 10 yds each White (W), Pink (P), and Black (Bl), 5/8" Brass Bell, two 4 mm Beads for eyes, Stuffing, White Curly Hair.
Additional Materials You Will Need: 8-12 oz plastic bottle filled with water or sand, Yarn Needle, Hot or Craft Glue.
Crochet Hook: Size G, or size needed for gauge
Gauge: 3 sc sts and 3 sc rows = 1"
|
Abbreviations |
|||
|
beg |
beginning |
sl st(s) |
slip stiches (s) |
|
rnd(s) |
round(s) |
st(s) |
stitch(es) |
|
sc |
single crochet |
sp |
space(s) |
|
Ch(s) |
Chain(s) |
YO |
Yarn Over |
Sc dec:Draw up a lp in next 2 sts, YO and draw through 3 lps on hook.
Body Directions
Rnd 1 (right side): Starting at top of head with P, ch 6, 3 sc in 2nd ch from hook, sc in next 3 chs, 3 sc in last ch, around other side, sc in next 3 chs; do not join rnds. Mark ends of each rnd. (12 sc)
Rnd 2:(2 sc in next 3 sts, sc in next 3 sts) twice. (18 sc)
Rnds 3-10:Sc in each st around.
Rnd 11:(Sc dec 3 times, sc in next 3 sts) twice. (12 sts)
Rnd 12:Sc in each st around. Finish off.
Rnd 13:Right side facing join R in last st of Rnd 12, (2 sc in next st, sc in next st) 6 times. (18 sc)
Rnd 14:(2 sc in next st, sc in next 2 sts) 6 times. (24 sc)
Rnds 15-28:Sc in each st around. (24 sc). Finish off at end of Rnd 28. You may have to add rows to cover bottle.
Arms (Make 2)
Rnd 1 (right side):Starting at bottom of mitten with Bl, ch 2, 8 sc in 2nd ch from hook; do not join rnds. Mark ends of each rnd. (8 sc)
Rnds 2-5:Sc in each st around. (8 sc)
At the end of Rnd 5; finish off Bl.
Rnd 6:Right Side Facing, join R in last st of Rnd 5, sc in next 8 sc; do not join rnds. Mark ends of each rnd. (8 sc)
Rnds 7-11:Sc in each st around. (8 sc). At end of Rnd 11, Finish off leaving a 12" strand of yarn for sewing.
Sleeve Cuff(Make 2)
Rnd 1:With W, ch 10, join with sl st to form ring, ch 1, sc in each ch around; join with sl st in first sc. (10 sc)
Rnd 2:Ch 1, sc in each sc around, join with sl st in first sc. (10 sc). Finish off.
Slide Cuff over arm covering line between black and red rows.
Hat
Rnd 1(right side):With W, ch 22, being careful not to twist chain, join with sl st in first ch to form ring, ch 1, sc in each ch around; join with sl st in first sc. (22 sc)
Rnds 2-3:Ch 1, sc in each st around; join.
At the end of Rnd 3, finish off.
Rnd 4:Wrong side facing of Rnd 3, join R in any st, ch 1, sc in same st and in each st around; do not join; mark ends of rnds. (22 sc)
Rnd 5:Sc in each st around.
Rnd 6:(Sc in next 9 sts, dec over next 2 sts) twice. (20 sc)
Rnd 7:(Sc in next 8 sts, dec over next 2 sts) twice. (18 sc)
Rnd 8:(Sc in next 7 sts, dec over next 2 sts) twice. (16 sc)
Rnd 9:(Sc in next 6 sts, dec over next 2 sts) twice. (14 sc)
Rnd 10:(Sc in next 5 sts, dec over next 2 sts) twice. (12 sc)
Rnd 11:(Sc in next 4 sts, dec over next 2 sts) twice. (10 sc)
Rnd 12:(Sc in next 3 sts, dec over next 2 sts) twice. (8 sc)
Rnd 13:(Sc in next 2 sts, dec over next 2 sts) twice. (6 sc) Finish off leaving long end.
Finishing
Using photo as a guide, finish as follows:
Stuff Head and place over bottle. Sew Arms over rnds 2-5 of body sides. Glue Eyes to Head. Glue White Curly Hair to Head around Eyes. Using long end of hat gather tip and sew Bell to tip of Hat – do not fasten off. Place Hat on head. Fold tip of hat over and sew tip in place.
Snowman
Finished Size: About 8" tall
Materials: Worsted Weight Yarn - 3 oz (60 yds) White,
30 yards each Black and Blue and 3 yards Orange,
Six 6 mm Black Beads, Stuffing, 2 Snowflakes, 8-12 oz Plastic Bottle filled with water or sand, Yarn Needle,
Hot or Craft Glue.
Crochet Hook: Size G, or size needed for gauge.
Gauge:3 sc sts and 3 sc rows = 1"
|
Abbreviations |
|||
|
BL |
back loop |
sl st(s) |
slip stiches (s) |
|
rnd(s) |
round(s) |
st(s) |
stitch(es) |
|
sc |
single crochet |
sp |
space(s) |
|
ch |
chain(s) |
YO |
Yarn Over |
sc dec:draw up a lp in each of next 2 sts, YO and draw through 3 lps on hook.
Body Directions
Rnd 1 (right side): Starting at top of Head with White, ch 6, 3 sc in 2nd ch from hook, sc in next 3 chs, 3 sc in last ch, around other side, sc in next 3 chs; do not join rnds. Mark ends of each rnd. (12 sc)
Rnd 2:(2 sc in next 3 sts, sc in next 3 sts) twice. (18 sc)
Rnds 3-10:Sc in each st around.
Rnd 11:(Sc dec 3 times, sc in next 3 sts) twice. (12 sts)
Rnd 12:Sc in each st around.
Rnd 13:(2 sc in next st, sc in next st) 6 times. (18 sc)
Rnd 14:(2 sc in next st, sc in next 2 sts) 6 times. (24 sc)
Rnds 15-28:Sc in each st around. (24 sc).
At the end of Rnd 28, finish off. You may have to add rows to cover bottle.
Arms (Make 2)
Rnd 1 (right side):Starting at bottom with White, ch 2, 8 sc in 2nd ch from hook; do not join rnds. Mark ends of each rnd. (8 sc)
Rnds 2-11:Sc in each st around. (8 sc)
At end of Rnd 11, finish off leaving 12" for sewing.
Hat
Rnd 1(right side): Starting at top of Hat with Black, ch 12, 3 sc in 2nd ch from hook, sc in next 9 ch, 3 sc in end ch, around other side, sc in next 9 ch, join in BL of first sc. (24 sc)
Rnd 2:Working in BL, ch 3 (counts as first dc now and throughout), dc in each ch around; join with sl st in first dc (join all dc Rnds in this manner). (24 dc)
Rnd 3:Working in both lps, ch 3, dc in each st around; join. (24 dc) Finish off.
Rnd 4:Right Side Facing, join Blue in any st, ch 3, dc in each st around; join. (24 dc) Finish off.
Rnd 5:Right Side Facing, join Black in any st, ch 3, dc in same st as joining, 2 dc in each st around; join. Finish off. (48 dc)
Scarf
With Blue, ch 40, dc in 4th ch from hook and in each ch across. (38 dc) Finish off.
Finishing
Using photo as a guide, finish as follows: Stuff Head and place over bottle. Sew Arms over rnds 2-5 of body sides. Glue Eyes to Head.
Nose:With Orange, ch 3, sl st in 2nd ch from hook and in next ch. Finish off leaving long end. Using ling end sew nose to Head.
Place Hat on head. Tie Scarf around neck. Glue snowflakes on Hat and Scarf.
All Rights Reserved ©2015 Maggie Weldon
We have made every effort to make sure the instructions are accurate & complete. We cannot however be responsible for human error, variations in individual work or typographical mistakes.
No part of our publications or websites may be reproduced or distributed by any means, including but not limited to: screen shots, photocopies, photographs, tracings, scans, uploads, emails, recording of instructions by word of mouth through storage and retrieval systems, without the express written consent of the publisher.


